Pages

Saturday, October 26, 2013

Scraps and love


I keep making little things.

Seems that's all I can focus on right now.
When I ran across these FALL scraps..
I couldn't resist
SEWING something up!

They DO make nice little gifts.
Thank you gifts.
I gave these away last night
to our dinner host
and she LOVED them!!
 
Makes all that stitching so SWEET!

I have enough scraps to make
MILLIONS of these little things.
 
Just imagine!
I could spread the love of quilting worldwide
if only I had the TIME!!!

The love of quilting is apparent at my home.
Every bed is COVERED.

Covered in
QUILTY LOVE.
:)

Thursday, October 24, 2013

Blue

While the loom was out.....

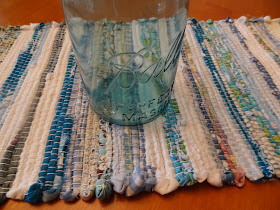
I made another table runner.
 
Blue and white.
It looks SO pretty with the blue tinted jar!
All I need are some FLOWERS IN the jar!

Friends:
It is NOT hard to MAKE these woven table runners.

It is hard to STOP making them!!!
 
;)
 
Made this for my daughter.
Used my 24" rigid heddle table loom.
1 1/2" strips of cotton were cut and used in construction.
IF the strip was ALREADY about 1 1/2"...
I did NOT trim.
Nothing is EXACT-ly done at my house!
Lots of what I call "uglies" were used.
I DO have quite a BIT of that kind of fabric.
;/
 
Is it really October?
My goal this year was to use ONLY fabric that I own.
The months have been FLYING by
and there is NOT a DENT anywhere!


Wednesday, October 23, 2013

weaving strings

My loom gets ALMOST as much time as my sewing machine.

It's a peaceful way to deal with scraps!

I dug around in my Christmas fabrics....

and added some bright green.

I DO love GREEN!

Sunday, October 20, 2013

pillows

Because I LOVE scraps.

Because I love blue and green.
Especially GREEN!

Because I love making things.....
Things that get USED!
 

Because I love fabric.
OLD fabric.
NEW fabric.
Doesn't matter.
 

Because I can't SIT STILL!
 
Happy scrappy sewing!

Friday, October 18, 2013

Friday

One twin size quilt
using shirts and other assorted plaids and stripes.

PLUS....
Lots of 2 1/2" squares from my drawer.
I'll NEVER use them ALL up
no matter HOW HARD I try!
;)

Don't we all LOVE these homey quilts???
 
This quilt is for a special little boy's BIG BED!
Need to get it quilted....
so he can GROW UP!!!
 
(This quilt is EXTRA special.
I made the wedding quilt....
The baby quilt...
and NOW....
I was ASKED to make this one!)


Wednesday, October 16, 2013

using UP

Crocheting like a quilter would.

Using UP bits and pieces of someone else's leftovers.
;)
 
This afghan is growing and growing.
I'm surprised at how LONG it takes to make one!!
AND...
How much YARN it requires!
Think I'm only halfway after MANY long drives
and QUITE a few chilly soccer practices.

Patching squares together
after dissecting some plaid and striped shirts.
 

Wondering if there's anything USEFUL here???

Sunday, October 13, 2013

Four Squared

 
I've been making these little coasters.
I'm calling the quilt block "four squared".
This will be my FOURTH set!
Probably not my last either!!!
LOL!
The holidays are coming...
and I THINK they make great little gifts!
 
 
'
One of my friends in blogland wanted a short
"how to".
I will oblige.
;)

Begin with two 1 1/2" strips
Mine are about 21" long.....
cut from fat quarters.
 

After sewing the two strips together cut into 1 1/2" segments.
These four segments will make ONE coaster.

Cut a couple more 1 1/2" strips.
You don't need much!
You're adding 2 1/2" pieces to the little segments.
 
Add a 2 1/2" x 1 1/2" LIGHT piece on the side of TWO segments.
 
Add a 2 1/2"x 1 1/2" DARK piece
on the side of the other TWO segments.


Arrange them like this.
 
Sew the pieces together.
Your block should be 4 1/2"x 4 1/2"

Layer:
Backing right side up.
(I cut mine a bit bigger than the block)
Coaster right side down.
Batting 4 12/"x 4 1/2"


Sew around the coaster leaving a small opening.

TRIM.

After turning it right side out.....
Pin the opening closed.
Slip stitch it closed.

Add some quilting stitches.
I used embroidery floss.....3 strands.
 
Begin by entering an inch or so AWAY from your beginning.
This is how you HIDE the knot.

Pull through.

Give a little TUG...and it will be HIDDEN.
:)

Do the same thing when you END.
Just make a knot....

And exit AWAY from where you stopped sewing.


Fish around with your needle to pull that thread INSIDE.
 

Make THREE more...
Tie them up with a ribbon
and GIVE something PRETTY AWAY!


Friday, October 11, 2013

Finally Finished!

The wedding quilt for Dear Daughter #1 is finally complete.
It only took almost FOUR years!
I just checked....
here's the very first post......
November 2009.
Here I'd been thinking it had been only 2 plus years!
TIME FLIES!

It fits MY bed JUST right!!!
 
Lots and LOTS of petals were painstakingly
hand appliqued onto squares
following a pencil line as my guide.
Since the instructions for this quilt along
were never completed and I couldn't figure out
some of it....
circles of petals were appliqued onto a VERY large!
EXTRA large!

I quilted this on my machine.
(ms. Juki)
Tension problems made the job more difficult.
ugh!
After quilting around each petal
I echoed the petals in the border.
 
I love the way it looks...
just wish my quilting was PERFECT!
Do we all LONG to be perfect quilters???
I'd actually settle for
HALF decent quilting!!!
;/

I pieced together a backing large enough.
90"x90"!!
Another effort at USING what I already OWN!
 

After looking high and LOW for a suitable binding,
Asking myself....
What color should I use???
 
I ended up with MUSLIN!
LOL!
It really IS the perfect touch.

It's all curled up on the floor....
waiting to be put into a box.
A box that will TRAVEL!!!
 
Yippee!
Happy to be done.
BUT....at the same time
Kind of SAD.
Sad to see my GOOD friend leaving home.